Categories
Calendars
Guides
Reviews
Archive
Gallery
Articles
Ask Our Gardening Expert
How To Design an Allotment (page 2)
GARDENACTION ALLOTMENT
The next step in your allotment design is to measure the site.
A rough measurement only is required, so walk up and across the
allotment counting steps as you go. One step is approximately 1 metre (1 yard).
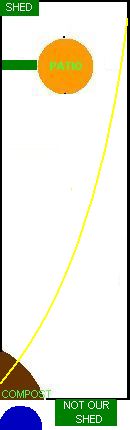
Draw up a rough scale drawing. Sketch in the
features (shed, compost heap etc.) you want. You will end up with
a drawing something like the one on the left. When on your
allotment make a note of the direction the sun moves during the
day. This is shown as the yellow line on the left hand diagram.
Finally sketch in any large objects on or near your allotment
which will cast a shadow. Our allotment has only one large object
which casts a shadow, the shed at the bottom of the diagram which
is on the next allotment. The final
piece of information you need is the location of the water source.
Ours is marked by the blue semi-circle. This may or may not be
important to you. When you add the location of the plant groups to
the diagram you may want to put water hungry plants nearest to the
source of water on your allotment. In our case the water is very
near our allotment so this will not be a factor in the design.
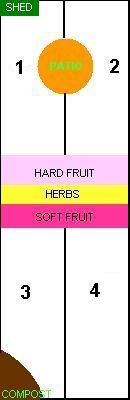
The next step is to add the planting areas. We have removed sun line,
water source and shade objects for the sake of clarity.
Crop rotation plays an important part in the design of your allotment,
and it will be mentioned briefly below. Use the navigation bar at the
top of the page for more detailed information on crop rotation.
Hard fruit, herbs and soft fruit are static crops and will remain
indefinitely in the same place. All other crops, principally vegetables,
should not be grown in the same position year on year. They should be
rotated round the site in a 3 year cycle.
In many vegetable rotation plans, the allotment is divided into 3 equal
parts (plus a fourth for static crops) allowing rotation of the 3
vegetable groups in a 3 year cycle. This does have a drawback though if
you want to grow potatoes. These take up significantly more room than
other vegetables and really create a fourth element to the rotation
plan. So your next step is to divide up your allotment into five areas
if you are growing potatoes or four areas if you want to grow potatoes.
Our plan above has five areas which are:
1.
Static fruit area for hard fruit, soft fruit and herbs. This
area can be placed anywhere on the site, but remember the sun
needs of the crops you are growing. We have grouped them all
together but they can also be in separate areas.
2.
Three areas (marked 1, 2 and 3) for all vegetables except
potatoes. These need to be roughly the same size for the
purposes of crop rotation.
3.
An additional area (marked 4) for potatoes. This also needs to be
approximately the same size as the three other vegetable areas.
Finally, when digging the allotment, think carefully
how you will bet the plants to cultivate them. Small undug paths
horizontally across your allotment every 1.8 metres (6ft) are a good
idea. Cover them with carpet or mulching plastic to keep weeds at
bay. These paths can also be used to divide up the allotment in a
way which will assist with crop rotation. We hope this article has helped you in designing
your allotment. If you have any questions, suggestions or want to
submit your own design for inclusion on our pages, please contact us
by clicking the link below.
How To Design an Allotment
(page 2)