Categories
Calendars
Guides
Reviews
Archive
Gallery
Articles
Ask Our Gardening Expert
Fuchsia
Propagation (continued) STEP 4 - MAKE THE CUTTING
The
cut to separate the cutting from the main plant should be made
above a leaf node (the point at which two or more leaves sprout
from the stem) - see above picture. Three sets of leaves should be above the cut, as
illustrated in the photo on the right.
During the process of taking the cutting, be careful not to damage the
stem - wherever possible, handle the cutting by the leaves. Name: Ruth Pechin ![]()
Propagating Fuchsias by Pictures
This page continues the six part process to propagate your fuchsia from
cuttings.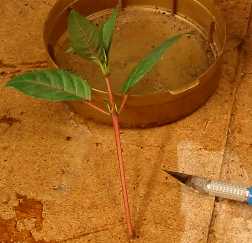
E-mail: pechinrj@wildblue
Date posted: October 13, 2010 - 06:57 pm
Message: Hi i live in the mountains of North Eastern Washington State, our growing season is very short I wondered if I could start in the fall and grow them inside over the winter
Thanks for your help